
The Mardigian Library is more than a place to go for information — it’s also a maker space.
Looking behind the front counter, between the movie shelf and the student worker station, a clear case houses a 3D printer: A LulzBot Taz 6 that’s ready to help you create something new.
Library Systems Administrator Patrick Armatis said that the library printer forms a variety of items — engineering class designs, personal crafts and educational models. He said all types of projects are welcome from current students, faculty and staff.
“3D printers are important to have on campus, a place where there is innovation, experimentation and practical application,” said Armatis, who said the LulzBot was gifted to the library from the College of Education, Health, and Human Services and the Hub for Teaching and Learning Resources so the printer could be located in a central space. “As these printers become more and more common in the workplace, we want our students to become familiar with how they work too.”
The library's systems department reviews all printing requests to scan the submitted digital files for any needed corrections. And, if everything looks good, they give it the OK to build. So start creating.
Get on the list.
Before your first creation can start to take shape, you’ll need to watch a couple short videos, read some 3D printing basics FAQs and pass a short quiz. Then you’ll be added to a list of 3D printer users, dubbed the “Mardigian Makers.” It’s a one-time requirement to help you understand the process a little better, Armatis said.
Know what you want to make.
If you don’t have your own design, Armatis suggests that you check out Thingiverse, an open source site where people post their 3D print designs for others to use.
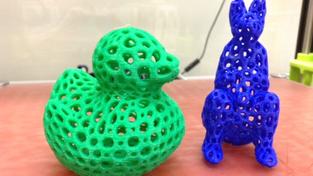
The site includes designs for test tube holders for labs. A T-Rex skull (with fossil-focused lesson plan) for upper elementary classrooms. Raspberry pi cases for techies. And, for Armatis, there was a Voronoi-style kangaroo. The little blue sculpture now sits in the drawer closest to the printer and he shares it as an example. “As a kid, I collected toy kangaroos; I think that’s why it’s the first item that I chose when test printing. I got the file on Thingiverse and I was very pleased on how it turned out.”
Work out the details.
The 3D printer does all sorts of shapes and sizes, but it does have limitations. There are instances where you may need to be crafty to accommodate it, Armatis said.
Let’s say you want to make a model of Saturn for a classroom. Since the printer creates by adding layers, an item can’t have suspended or overhang design because there needs to be a support structure. So you couldn't print the rings of Saturn directly onto a model of the planet since there isn't something that would hold them into the air. But you could print the planet and the rings as separate files and put them together after printing.
Another example is that you can't make an object any larger than 230 x 230 x 230 mm, which is about the size of a soccer ball.
“There is usually a way to still make an idea work. If you aren't sure about something, you can ask us to look at your design file to see if any changes need made before the printing process. If there is a concern, we can also offer suggestions.”

Other before-you-print tips are:
• Choose only one color per file. There are multiple filament colors, but only one can be used per make.
• Make your letters or numbers at least 7 x 7 mm if your design includes characters.
• Download this free Cura LulzBot software program or submit your design to the library to figure out the cost. It’s a nickel per gram.
Print.
Armatis said the printing timeframe depends on what’s already on the 3D printing calendar, but items are typically scheduled to print within 48 hours. He said the printing process can take between two to 16 hours depending on the complexity.
“Sometimes small pieces take longer than larger ones because of the details involved. So you can’t use size to judge,” said Armatis, noting that the library systems staff can share an approximate pick-up time prior to printing. “As soon as it’s done, we’ll contact you and let you know that it’s ready.”


